Atari ST OPL3 cartridge project phase 0
I didn’t plan it, but I’ve started it anyway. When I was playing around with OPL3LPT on Atari I thought that it would be cool to develop and produce dedicated Atari ST cartridge with OPL3 chip. Other platforms have it – C64, MSX, Atari 8-bit to name a few, no one has done it before on Atari ST or made it with inferior chips, so how hard it can be?
As I don’t have any experience with interfacing with ST cartridge port (and with electronics in general, it’s just my second hardware project) I thought that it would be reasonable to design and manufacture set of helper boards to have possibility to plug into SMT components and play around with circuit design before diving in directly into full pcb production.
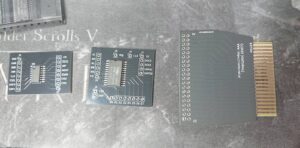
I needed a small board to plug into ST cartridge port and attach logic analyser and / or prototyping board to it, along with set of two boards to connect OPL3 and YAC-512M (dedicated OPL3 DAC) to protoboard and other components (amplifiers, oscillator, audio output etc..) with simple wires. Both DAC and OPL3 are only manufactured in SMT versions, so there is no simple way to connect signals.
If circuit will work as expected, then next step will be designing final pcb and preparing cartridge case.
Designing boards was rather easy, maybe cartridge port was more involved, because I had to figure out correct dimensions, lay out pads of edge connector and compare with ST cartridges I had.
I didn’t have correct footprints for ST cartridge port, OPL3 DAC and OPL3 itself in KiCAD, so I had to design them basing partially on datasheets.
Before sending everything to pcb manufacturer I’ve printed out every design on paper in 1:1 scale to make sure that both OPL3 and DAC actually fit on circuit pads and ST cartridge edge connector is right. After several iterations I’ve nailed designs and sent boards to production (5pcs per board).
Boards turned out to be fine:

I’ve started to assemble them and managed to solder SMT components. I’ve soldered SMT first time in my life. Perspective of soldering SMT was scary, but I’ve watched this video and it turned out to be not as bad as I thought – with proper equipment and good flux it’s easy:

I’m still waiting for other components (connectors, op-amps, some resistors and oscillators) to push things further. Cart will have a killer name for sure, but I think about it after I will have working prototype. Still I have to figure out cart cases production, there are two options: 3d printing or making moulds and casting cases from resin. Of course if it will have chance to be viable end product and if I ever reach production phase.
In the meantime I’ve ordered two boards with OPL3: RetroWave Express and OPL3 Duo! (,which contains two OPL3 chips). First one uses USB/Serial interface, so maybe there will be possibility to write USB drivers for it (Lighting ST / NetUSBee), second one maybe could be driven via cartridge port and / or parallel port (like OPL3LPT) with correct interfacing (it’s geared towards Arduino/ Raspberry PI/ Teensy). Hard to tell if any of this options will work at this point, because boards haven’t arrived yet.
Probably at the end of the project I will make some round up and try to show how expensive was designing and manufacturing of this rather simple piece of hardware.
About this entry
You’re currently reading “Atari ST OPL3 cartridge project phase 0,” an entry on [nokturnal].
- Published:
- 4 May 2023 11:29 PM
- Category:
- Atari 16/32 bit, cartridge port, OPL3 (YMF262), ST/STe, TT, News


Comments are closed
Comments are currently closed on this entry.